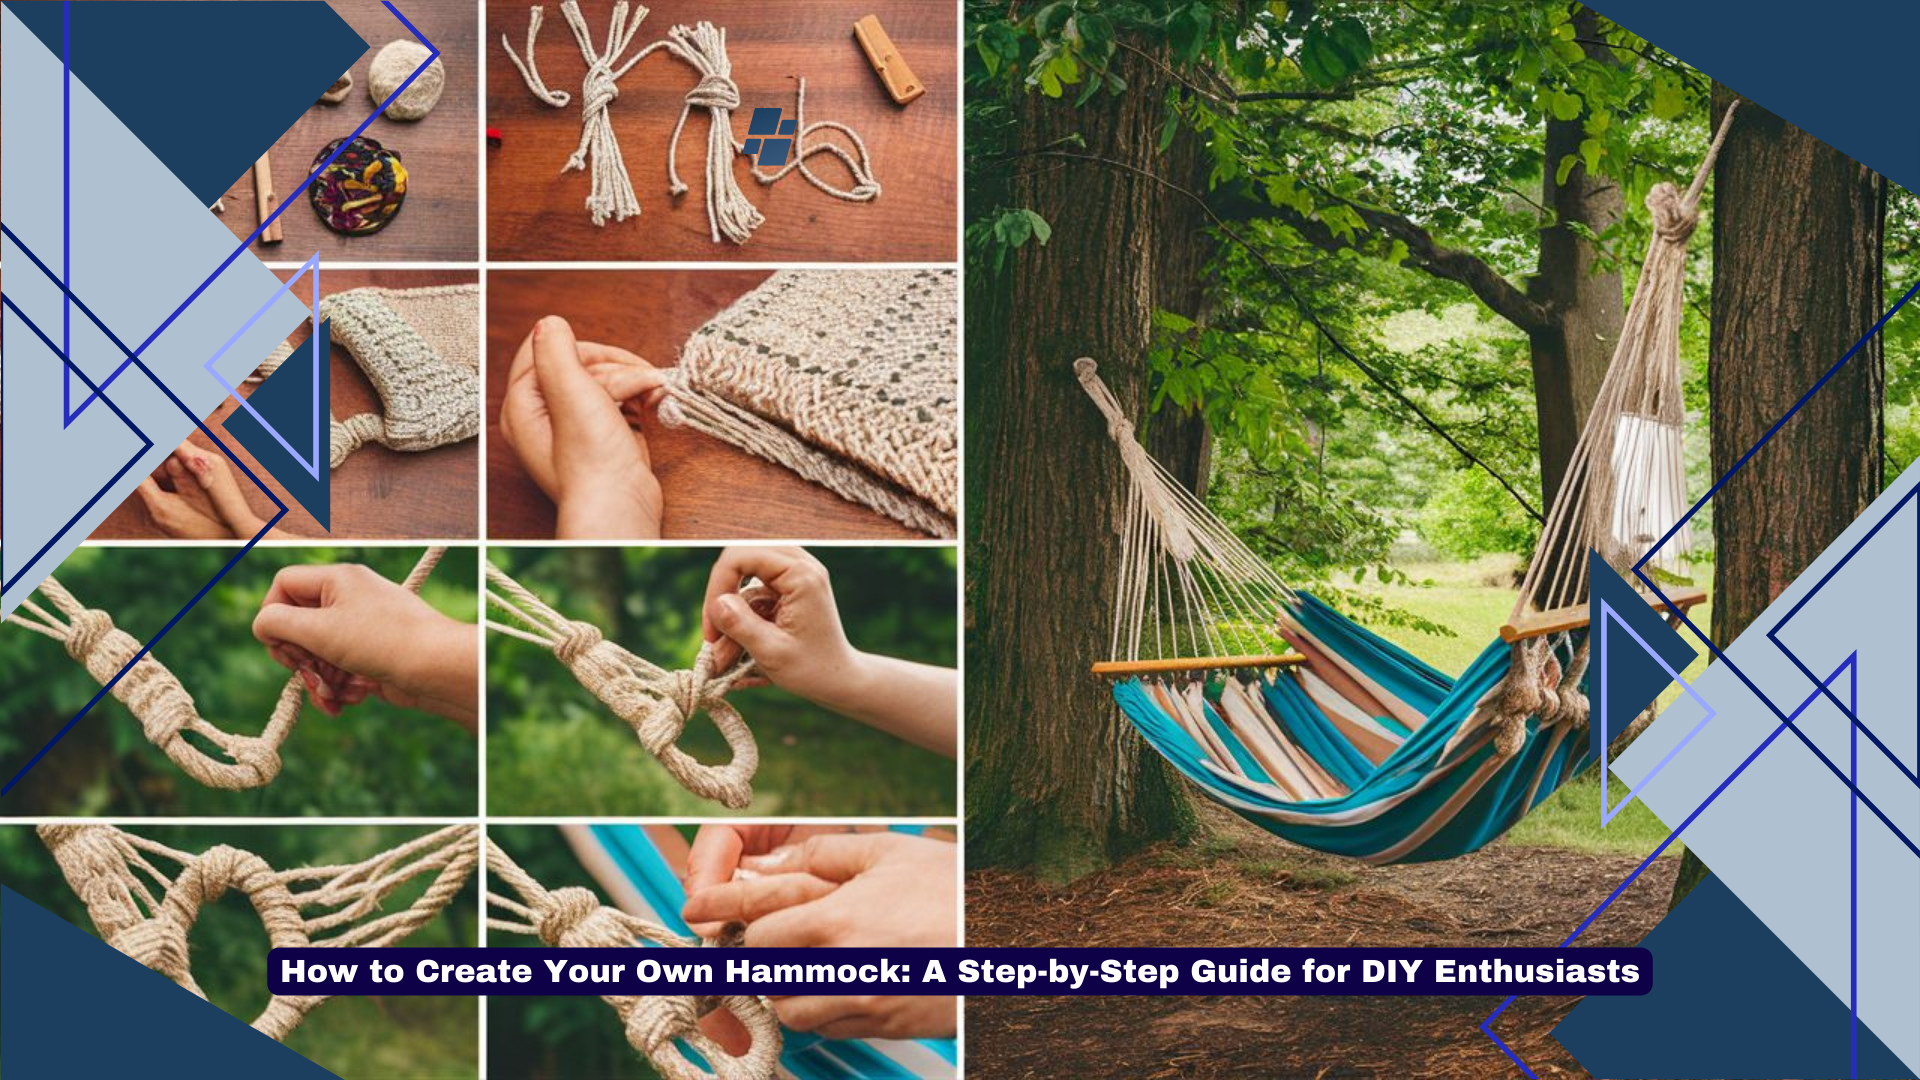
Are you yearning for a peaceful retreat in your backyard? Look no further than a hammock, the epitome of relaxation. While purchasing a hammock is an option, why not take it a step further and create your own? DIY hammocks not only give you a sense of accomplishment but also allow you to customize the design and materials to suit your preferences. In this comprehensive guide, we will walk you through the step-by-step process of creating your very own hammock, ensuring you can enjoy the gentle sway of your creation in no time. So, roll up your sleeves and let’s embark on this exciting DIY adventure!
Table of Contents
Choosing the Right Materials
When it comes to crafting your DIY hammock, selecting the right materials is crucial for both comfort and durability. Here’s what you’ll need:
1. Hammock Fabric
The fabric you choose will determine the overall comfort and longevity of your hammock. Look for a durable, weather-resistant fabric such as nylon or polyester. These materials are not only sturdy but also quick-drying, making them ideal for outdoor use. Additionally, consider the weight capacity of the fabric to ensure it can support your desired weight.
2. Rope or Webbing
To suspend your hammock, you’ll need a reliable rope or webbing. Look for ropes made of polyester or nylon as they offer excellent strength and resistance to wear and tear. Alternatively, you can opt for webbing straps, which distribute weight more evenly and minimize damage to trees or other supports.
3. Carabiners or S-Hooks
Carabiners or S-hooks are essential for attaching your hammock to the suspension system. Make sure to choose sturdy and rust-resistant options that can withstand outdoor conditions. Consider the weight capacity of the hooks to ensure they can handle the load.
4. Hardware and Tools
Don’t forget to gather the necessary hardware and tools for assembling your hammock. This may include items such as screws, bolts, washers, and a drill or screwdriver. Having the right tools on hand will make the construction process smoother and more efficient.
By carefully selecting high-quality materials and gathering the appropriate tools, you’ll set a solid foundation for creating a durable and comfortable DIY hammock.
Measuring and Cutting the Fabric
Now that you have gathered all the necessary materials, it’s time to measure and cut the fabric for your hammock. Follow these steps:
1. Determine the Length
Decide how long you want your hammock to be. A standard hammock is usually around 10-12 feet long, but you can adjust the length based on your preferences and available space. Measure and mark the desired length on the fabric.
2. Calculate the Width
The width of your hammock will depend on whether you prefer a single or double hammock. A single hammock typically ranges from 3-4 feet wide, while a double hammock can be around 5-6 feet wide. Measure and mark the width accordingly.
3. Add Extra Length for Hemming
To create a neat and finished look, you’ll need to leave some extra fabric for hemming. Add an additional 2-3 inches to both ends of the fabric to account for this.
4. Cut the Fabric
Using sharp fabric scissors or a rotary cutter, carefully cut along the marked measurements. Take your time to ensure clean and straight edges.
Remember, accuracy is key when measuring and cutting the fabric for your hammock. Take precise measurements and double-check before making any cuts to avoid any mishaps or inaccuracies.
Assembling the Hammock
With the fabric cut and ready, it’s time to assemble your DIY hammock. Follow these steps to ensure a secure and comfortable final product:
1. Reinforce the Edges
To prevent fraying and increase the strength of your hammock, reinforce the edges by folding the fabric over and sewing a sturdy hem. This will help prolong the lifespan of your hammock and ensure it can withstand regular use.
2. Attach the Suspension System
Depending on the type of suspension system you’ve chosen, follow the manufacturer’s instructions to attach it securely to both ends of the fabric. This may involve threading ropes through designated holes or using webbing straps with adjustable buckles. Ensure that the suspension system is tightly secured to avoid any accidents or instability.
3. Test for Stability
Before fully committing to your newly constructed hammock, it’s crucial to test its stability. Hang the hammock at a low height and gently sit or lie down on it. Check for any signs of strain, weakness, or slippage. If everything feels secure and comfortable, you’re ready to proceed.
4. Find the Perfect Spot
Now comes the exciting part – finding the perfect spot to hang your DIY hammock. Look for sturdy trees, posts, or supports that can handle the weight of the hammock and provide a safe and enjoyable experience. Make sure to hang it at a suitable height for easy access and relaxation.
By carefully assembling your hammock and ensuring its stability, you’ll be able to enjoy hours of blissful relaxation in your very own creation.
Enhancing Your Hammock Experience
Now that your DIY hammock is ready to be enjoyed, let’s explore some ways to enhance your experience and make the most out of your tranquil retreat:
1. Add Comfort with Cushions and Blankets
To create a cozy and inviting atmosphere, consider adding cushions and blankets to your hammock. This will not only provide extra comfort but also allow you to relax for extended periods without discomfort. Choose soft, weather-resistant materials that are easy to clean and maintain.
2. Install a Shade Canopy
If your hammock is located in an area with direct sunlight, installing a shade canopy can provide relief from the scorching heat. You can use a portable canopy or even construct a permanent one using a lightweight fabric or bamboo poles. This will allow you to enjoy your hammock even on hot summer days.
3. Create Ambience with Lighting
To set a serene and inviting ambiance, consider incorporating lighting elements around your hammock. String up fairy lights or hang lanterns to create a soft and enchanting glow during the evening hours. This will enhance your relaxation experience and make your outdoor space feel magical.
4. Embrace Nature with Surrounding Greenery
Make your hammock area feel like a tranquil oasis by surrounding it with lush greenery and flowers. The presence of plants not only adds a touch of natural beauty but also promotes a calming and refreshing atmosphere. Consider planting climbers or hanging baskets nearby to create a natural canopy effect.
By incorporating these enhancements, you can elevate your hammock experience and create a serene haven where you can unwind and rejuvenate.
Maintaining and Storing Your DIY Hammock
Proper maintenance and storage are essential for ensuring the longevity and continued enjoyment of your DIY hammock. Follow these tips to keep it in top condition:
1. Regular Cleaning
Keep your hammock clean by regularly removing debris such as leaves, dirt, and bird droppings. You can simply shake off the loose dirt or use a soft brush to gently scrub the fabric. If needed, you can also hand wash the hammock using mild soap and water. Avoid using harsh chemicals or bleach that may damage the fabric.
2. Drying Thoroughly
After cleaning or exposure to rain, make sure to thoroughly dry your hammock before storing it. This will prevent the growth of mold or mildew, which can deteriorate the fabric. Hang the hammock in a well-ventilated area or use a clothesline to ensure proper drying.
3. Protecting from the Elements
When not in use, protect your hammock from harsh weather conditions by storing it indoors or using a hammock cover. This will shield it from prolonged exposure to sunlight, rain, and extreme temperatures, which can cause fading and weakening of the fabric.
4. Inspecting for Damage
Regularly inspect your hammock for any signs of wear and tear, such as fraying ropes or weakened fabric. Repair or replace any damaged components promptly to maintain the safety and integrity of the hammock.
5. Proper Storage
During the off-season or when not in use for an extended period, store your hammock in a dry and cool place. Avoid folding it tightly to prevent creases and instead loosely coil or roll it to minimize stress on the fabric and suspension system.
By following these maintenance and storage practices, you can ensure that your DIY hammock remains in excellent condition, ready for many relaxing moments to come.
Conclusion: Enjoy Your DIY Hammock Retreat
Congratulations! You have successfully created your own DIY hammock and are now ready to embark on a journey of relaxation and tranquility. By following the steps outlined in this guide and using high-quality materials, you have crafted a comfortable and durable hammock that suits your preferences.
Remember to take proper care of your hammock by cleaning it regularly, protecting it from the elements, and inspecting for any damage. By doing so, you can ensure its longevity and continued enjoyment for years to come.
Now, find the perfect spot in your backyard, patio, or even on camping trips to hang your hammock and immerse yourself in moments of serenity. Whether you’re reading a book, taking a nap, or simply enjoying the gentle sway, your DIY hammock will be your go-to retreat for relaxation.
So, sit back, unwind, and let the hammock envelop you in its comforting embrace. Embrace the blissful moments and bask in the joy of your own creation. Happy hammocking!
Additional Tips and Ideas
As you embark on your DIY hammock journey, here are some additional tips and ideas to enhance your experience:
1. Hammock Accessories
Consider adding accessories such as a hammock pillow, cup holder, or even a small storage pouch to hold your essentials while lounging. These accessories can further elevate your comfort and convenience.
2. Hammock Stand
If you don’t have suitable trees or supports to hang your hammock, consider investing in a hammock stand. This versatile and portable option allows you to set up your hammock anywhere you desire, whether it’s on the patio, at the beach, or even indoors.
3. Hammock Swinging Techniques
Experiment with different swinging techniques to find your preferred rhythm and motion. Whether it’s a gentle sway or a more vigorous swing, adjust your body movements to find the perfect balance of relaxation and excitement.
4. Hammock Safety
Always prioritize safety when using your hammock. Ensure that the suspension system is properly secured and regularly inspect the fabric and components for any signs of wear or damage. Follow the weight capacity guidelines and avoid exceeding the recommended limit.
5. DIY Hammock Upgrades
Feel free to get creative and customize your hammock further. Add decorative elements, such as colorful fabric patterns or fringe, to personalize your creation and make it truly unique.
With these additional tips and ideas, you can truly make your DIY hammock experience your own. So, embrace your creativity and get ready to enjoy countless moments of relaxation and bliss in your homemade retreat.
Share Your DIY Hammock Journey
Now that you have successfully crafted your own DIY hammock, why not share your journey with others? Here are some ways to showcase your creation:
1. Social Media
Take some captivating photos of your hammock setup and share them on your favorite social media platforms. Write a caption explaining the process and the satisfaction you derived from creating your own personal oasis. Use relevant hashtags to reach a wider audience of fellow DIY enthusiasts.
2. Blog or Website
If you have a blog or website, consider writing a detailed post about your DIY hammock project. Include photos, step-by-step instructions, and any valuable tips or insights you gained along the way. This can serve as a helpful resource for others interested in creating their own hammocks.
3. DIY Communities and Forums
Engage with DIY communities and forums online to share your experience and inspire others. Post about your DIY hammock project, answer questions, and provide guidance to those who are interested in embarking on a similar journey.
4. Local Events or Workshops
If you’re passionate about DIY projects, consider organizing a local workshop or event where you can share your knowledge and teach others how to create their own hammocks. This can be a fun and interactive way to connect with like-minded individuals in your community.
By sharing your DIY hammock journey, you not only inspire others to embark on their own creative projects but also contribute to the vibrant DIY community. So, don’t hesitate to spread the joy and satisfaction that comes from crafting your own handmade retreat.
Final Thoughts: Embrace the Serenity of Your DIY Hammock
Creating your own DIY hammock is a rewarding and fulfilling experience that allows you to immerse yourself in the serenity and tranquility of your own backyard or outdoor space. By following the steps outlined in this guide, you have gained the knowledge and skills to construct a comfortable and durable hammock tailored to your preferences.
Remember, the process of creating your own hammock is just as important as the end result. Embrace the journey, enjoy the moments of creativity, and relish in the satisfaction of crafting something with your own hands.
Once your hammock is complete, take the time to fully embrace the peaceful retreat it offers. Find moments of solitude, unwind, and let the gentle sway and comfort of your hammock melt away the stress and worries of the day. Use this space to reconnect with nature, read a book, meditate, or simply enjoy the beauty of your surroundings.
As you embark on your hammock adventures, continue to explore new ways to enhance your experience. Whether it’s adding accessories, trying different swinging techniques, or sharing your journey with others, let your creativity and passion guide you.
So, gather your materials, follow the steps, and embark on the fulfilling journey of creating your very own DIY hammock. Embrace the serenity it offers and create a haven of relaxation and rejuvenation in your own backyard.
In conclusion, crafting your own DIY hammock is a wonderful way to create a personal oasis of relaxation and tranquility. By following the step-by-step process outlined in this guide, you have acquired the knowledge and skills to construct a comfortable and durable hammock that suits your preferences. Remember to choose high-quality materials, measure and cut the fabric precisely, assemble the hammock securely, and enhance your experience with accessories and thoughtful additions.
Not only does creating a DIY hammock provide a sense of accomplishment, but it also allows you to customize every aspect to suit your unique style. Whether you choose to hang it in your backyard, take it on camping trips, or simply enjoy it on lazy afternoons, your DIY hammock will be your go-to retreat for relaxation and rejuvenation.
Now, it’s time to embark on your hammock journey. Let the gentle sway and comfort of your creation transport you to a place of serenity and peace. Share your experience with others, inspire fellow DIY enthusiasts, and continue to explore new ways to elevate your hammock experience.
So, gather your tools, unleash your creativity, and embrace the joy of creating your very own DIY hammock. Get ready to unwind, let go of the stresses of everyday life, and indulge in moments of pure relaxation.